We’ve gone over everything that involved the sections and categories of managing your ads, now we’ll cover the basic interface of finding your way around, and knowing what button does what.
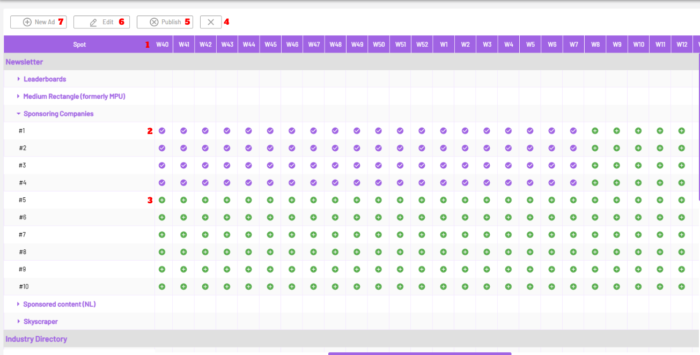
1– Ads Table Header: To start off, you can see the header above in a purple layout. The columns are Spot, Current Ad, Advertiser, Running, Running till, Impressions/Opens, Clicks and the Weekly Stretch.
–Spot column contains the section header and categories of each ad that you can create and manage.
–Current Ad displays the ID of the ad created under a certain section in the spot.
–Advertiser column displays the company/organisation registered under the ad.
–Running column displays the time period since the ad was created.
–Running till column displays the time period until the ad will stop being featured on the space.
–Impression Opens column displays the number of times the ad has been viewed by your audience.
–Clicks show what you think it does, the number of times a user clicked on the ad, obviously.
-The Weekly stretch column divides into each week that the ad will be sent out until the final week, based on the Running till column. So if you created an ad to run for a month, the weekly stretch columns would show W1, W2, W3, and W4.
2– The purple tick icon indicates that an ad was successfully published in a certain week stretch under the ad spot. If you double-click on the icon, you’ll be able to Edit, Archive or Unpublish the current ad.
3– The green plus icon indicates space to create an ad in a specific week slot. As you can see above, there are several spaces you can add ads, just for a certain week based on your certain needs. If you double-click on the icon, you’ll see the same options as in 2, but you’ll only be able to create a New Ad.
These are the main features of the Ad space and navigating around all the headers and sections, the only thing left to do is highlight the key functions that make setting up an ad seamless and effective.
4– This button is to unpublish an ad. Just select the ad of your choice, and click on the button to close the ad. This action would prevent the ad from running on the next day/week slot.
5– Publish: After creating and setting up a new ad, you can publish it with this button. Be sure to select the ad first, as this button will not be active until you’ve selected an unpublished ad.
6– Edit: Every ad created is saved as a draft, so you can always come back to finish it up by selecting the specific ad and clicking on this button to edit it.
7– And finally, we have the most important feature of them all, creating a new ad. To do this, first select an ad space in any of your chosen sections. Selecting would require double-clicking on the spot you want an a created on. Once you do this, you should see the screen below:
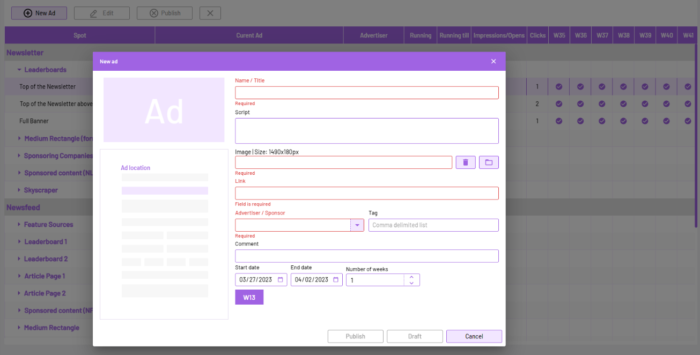
We’ll go over each field briefly to give an overview f what is required in creating a new ad.
–Location display: On the left, you’ll see the location where your ad will is seen based on the section you’re creating the ad from( Leaderboard, skyscraper, medium rectangle, etc.)
–Name/Title: This field is for the name of the ad you want to use.
–Script: The script is the description of the ad you’re creating, you can see the way meta works with websites and articles.
–Image Size: The Image Size field is for uploading the ad image you wish to use. The recommended dimension for the ad is shown to you, and you can also change the image of the ad with the delete icon.
–Link: The link here will be the location when a user clicks on your ad.
–Advertiser/Sponsor: This field displays a dropdown to select the advertiser behind the ad. You can add to the list by typing in the sponsor of your choice if it isn’t among the values from other ad setups.
–Tag: The Tag field includes the tags you can associate with the ad in order to boost the view and performance metrics (click, open and impressions).
–Comment: You can include comments in this ad. Like instructions or further details that will only be visible on the portal end and not to your users.
–Date periods: The date periods include the start date and end date that you want for the ad, as well as a field to specify the number of weeks you want it to run for.
When you’re done setting up all the necessary fields in creating a new ad, you can either save it with the Draft button or proceed to Publish your ad to be live to your users. You can also Cancel to stop the process entirely and lose the field info, but you probably already knew that.
And with a whole bunch of words and two guides later, you’re all set to create and manage your content advertisements on CaboodleAI! Be sure to take your time to go over both guides, starting with Sections and Categories, and then this one.
You can contact us if you have any enquiries, or encounter any issues with setting up your ads, and we’ll be happy to help.


