Now that your Caboodle site is up and ready to go, and you have some understanding of the many features that make it work, let’s talk about working with your sources.
You can look at it this way- your new portal is a brand new car you just got, and the engine is Morla. So what does an engine need to make the car work effectively? Yes, you guessed right, it needs fuel! Your content source is the fuel you need, and the more you put in your engine, the more efficient your car will be, so it’s best to start with a full tank!
Based on your Caboodle plan, there’s a limit to the sources you can add to your site, but you can start out by filling in all your available sources, that way Morla is able to identify and aggregate more efficiently and all at once.
You’re still free to add sources at intervals, or based on the availability, you’d still get your premium content, all organised and ready for you.
So here’s how you add your sources;
-
First, login into your portal with your company id.
-
Once you’re in your portal, click on “Sources” in the left plane of your screen
-
Here you have the Sources page, with details and features as explained below:
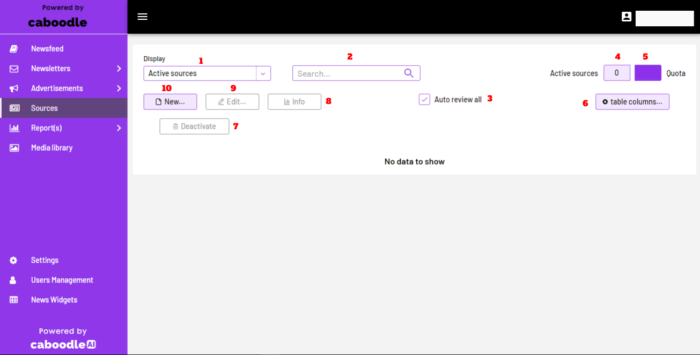
1- Display dropdown: This enables you to modify your view of the current sources on your site. If you click on the dropdown, you can select your view to “Active Sources”, “All Sources”, “Removed Sources”, and “Wildcard Sources”
2- Search Bar: This feature is exactly what you think it’s for, to scratch for a certain source.
3- Auto-review: This is a check that prompts Morla to review all your sources and approve them herself. Unchecking it would mean manually reviewing content from the sources based on your choices.
4- Active Sources: This display shows the sources that are actively pulling our content.
5- Quota: This display shows the maximum number of sources you can have based on your subscription plan with Caboodle.
6- Table Columns: This feature helps in filtering what source fields you wish to display. These could include Source Name, Creation date, URL, and much more.
7- Deactivate: This feature allows you to delete/deactivate a selected source.
8- Info: This enables you to view the stats on a source, and how it performs with its content.
9- Edit: You definitely know what this means, so we’ll move on.
10- New: Now this is where we’ll be moving on from, clicking on “New” loads the page below for adding a new source.
-
Caboodle has 3 different means to add a source.
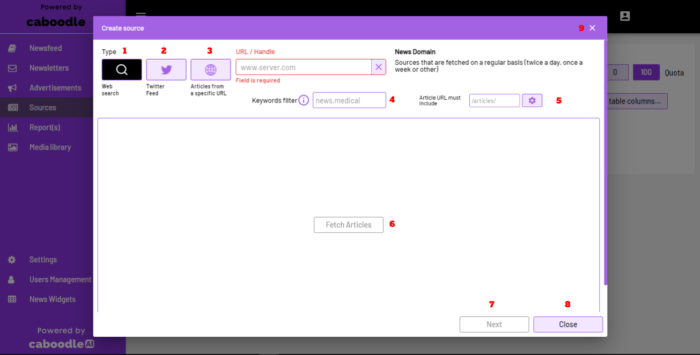
As you can see from 1, 2, and 3 above, you can add a source either through;
1. Web Search: You add a source here by searching articles that have been indexed by Google and just pasting the link of the website you want to pull content from. The link would be pasted in the “URL/Handle” text box, and with 4, you can choose to add a keyword filter so Morla can pull the specific content you need. The Web Search source type can also be listed as “Google Search”, and it’s the same source type that involves pulling your articles generally from the web based on the URL included.
An example would be: www.bbcnews.com would go into the URL text box, and Morla would only pull content from www.bbcnews.com
2. Twitter Feed: You can add a source here by pasting the Twitter link or account handle that you want to pull content from. This would aggregate only articles that have been published to the particular Twitter handle, along with retweets if there’s an article URL. The link or Twitter handle would be pasted in the “URL/Handle” text box.
An example would be: www.twitter.com/bbcnews or @bbcnews would go into the URL text box, and Morla would only pull content from www.bbcnews.com
3. Article from Specific URL: This one is a favourite, and for good reason. You can add a source here by pasting the extended link of an article or website under a certain tag or category. This way allows you to go directly to the website and would require the snippet from the URL that is common in all articles The link would be pasted in the “URL/Handle” text box, and with 5, you can choose to add a URL tag to pull content from a certain category of a website, like “news”, or “articles”
An example would be: www.bbcnews.com would go into the URL text box, and you would then add the snippet /news/ in 5. That way, Morla would only pull content from www.bbcnews.com/news/.
- Once you’ve chosen your means to add your source, and pasted the link, go ahead and click on “Fetch Articles” where 6 is.
-
In less than a minute, or a bit more, you would see some content being generated from the source:
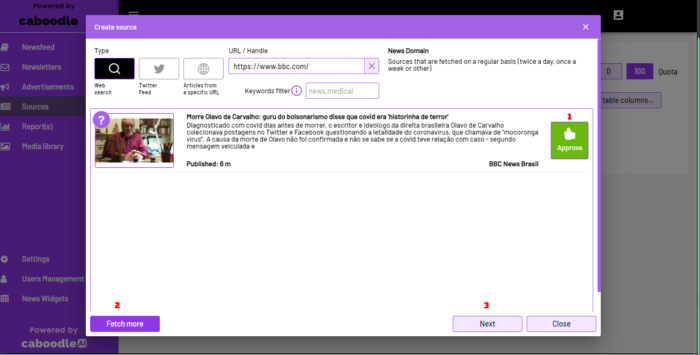
As you can see from 1, 2, and 3 above, you can manually approve the content immediately, try to fetch more from the source, or move on to the next process of adding the source.
-
When you click on “Next”, you’ll see the next (and final) page in adding your source.
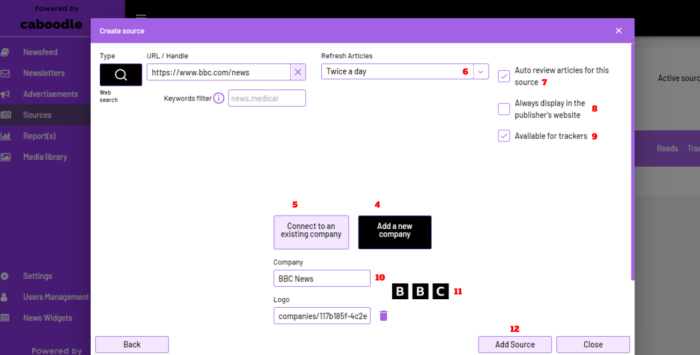
As you can see from 4 through 12 above, these are the final touches to adding a source:
4- Add a new company: This is an option that automatically assigns the source to the company in the URL. It is selected at default with the black highlight
5- Connect to an existing company: Selecting this option enables you to link the source to an existing company in your sources database. A dropdown would appear once you click on it, and you’ll be able to select the company you want to link the source to
6- Refresh Articles: This dropdown feature helps you choose how frequent you want Morla to pull content from the source. You can select your desired refresh rate when you click on it.
7- Auto Review Article: This is similar to the auto review feature on the Sources-1 page. With this, you decide for each source you want to add, whether you wish for Morla to review, or to be unchecked for manual review.
8- Always display in the publisher’s website: Checking this box would ensure that this source always shows up in your newsfeed.
9- Available for trackers: Trackers are subscribers that can personalise the content they receive from you. This is checked on default for all content from this source to be available to your trackers, and you can decide to disable it for a certain source.
10- Company: This displays the company name from the source added, it is generated automatically.
11- Logo: The company logo is also generated automatically from the source.
12- Add Source: This concludes your source setup, by clicking on this, the source is added and Morla will continue pulling from it to keep your site fresh with content.
Congratulations, you’ve set up your first source! You can set up as many news sources as required on your site, however, there would be some restrictions on them for aggregating content after a certain limit. Basically, the first 1-100 sources added would pull content twice a day, but once 100 sources are created, any new source set up will only pull content once a week. As an example, you can have 500 sources created in total, but the first 100 will pull articles twice a day, while the remaining 400 will be once a week.
So what if you have about 50-100 sources, would it all be added one after the other? Well yes, unfortunately, it would, as automating batch source uploads is still on its way for Caboodle AI.
If doing this feels like too much of a hassle, you can always book a call with us, and we’ll discuss on us helping with all your sources set up, so you don’t have to worry about it!
Have any issues with your adding source?


