Okay so you’ve set up your Caboodle site, and then you log in and you see a lot, and we mean a lot on your site. No worries though, we’re here to go over each one briefly so you get the idea of how it all works.
Now after you’ve logged in to your site , you should see this screen:
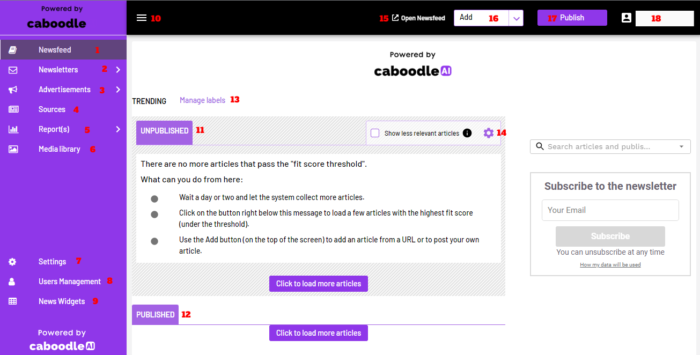
As seen above, 1-18 are the basic features that make up your site;
1- Newsfeed: Your Newsfeed is the default view screen when you login into your site(as you see it highlighted). It displays a summary of all the content your site has and is divided into the Unpublished section and the Published section(more on them later). You can just see it as where you view and control all the content your users and subscribers will read
2- Newsletters: The Newsletter section comprises email sends and newsletters to your subscribers and trackers. You can create a newsletter based on different templates, manage your audience and track their source, and also get access to global statistics to give a view of how your content is doing based on reads, opens, deliveries and much more.
3- Advertisements: This view helps you create and manage ads that you can include in your newsfeed and newsletters for your users.
4- Sources: In this section, you can add and manage the sources of your content. Take this as the “behind-the-scenes” of your site. Morla generates content from your sources and sends them over to the Newsletter section to be reviewed.
5- Reports: Over here we go deeper into stats on your content, site and everything else to give you full control, and help manage the performance and analytics.
6- Media Library: We provide you with full control to customise as much as you like, so you don’t have to worry about Caboodle’s branding everywhere. The Media Library is like your gallery for your site, where all your backgrounds and images will be stored and managed.
7- Settings: Well this doesn’t need much of an intro right? The settings of your Caboodle site are what we like to call “Morla’s Workshop”. In this section, you can configure how other features of the site work and further customise based on your requirements.
8- User Management: You can have more than one person with access to your site. In this section, you can decide to create more admins, or change the password to your account, among many other settings.
9- News Widgets: This section is linked to the Newsfeed, but it needs a whole space for itself. With news widgets, you get to configure and customise how the news will be displayed to your subscribers and trackers.
10 – To change the view of the feature bar, you can collapse or minimise it based on your preference.
11- Unpublished: This view shows the aggregated content that is currently waiting to be reviewed and published. Articles that show here are not visible to your subscribers and users
12- Published: This view shows the aggregated content that has either been reviewed manually or by Morla. Articles that show here are visible to your subscribers and users.
13- Manage labels: A label is used to link an article to a specific segment, keyword or topic within your industry. Labels can be applied to articles automatically or manually to categorise the articles based on keywords and topics, that Trackers are then able to follow. Clicking on this helps you manage the general labels of all the content available.
14- The gear icon helps you change your fit threshold score for your content. The Fit Score © indicates how relevant an article is in relation to the overall content of your business. Morla generates a score for each content it aggregates, and with this icon, you can filter content based on its Fit Score.
15- Open Newsfeed: This button at the top right of your screen takes you directly to your site’s newsfeed so you can prototype changes you make and see how it looks directly.
16- This feature enables you to add an article directly if you have something in mind, and don’t want Morla to pull all the content from its source. You can either add from the list of aggregated content, add directly from a source link, or create a post entirely.
17- Publish: The publish button is clicked on when you’ve approved and reviewed all the content in the Unpublished section and you’re ready for it to be live for your audience.
18- This displays the account being used and the name of the account. You can choose to go into your profile or log out by clicking on it.
The above-mentioned are for the basic Caboodle site that doesn’t have the subscription features of the Industry Directory. If your subscription details include that, then your site would include an additional feature in the left plane, between Newsletters and Advertisements. It would look something like this;
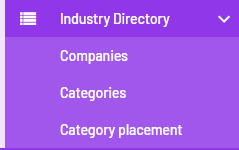
Every other listed feature still applies to this site, so you have nothing to worry about with the differences.
Industry Directory: The Industry Directory feature helps you include companies and organisations as part of your audience. This feature allows companies to register for your validation process directly from the directory page. It consists of the Companies section which displays companies in your directory, and then the Categories and Category placement sections help you manage them effectively based on your requirements.
Now that wasn’t so much now was it? We intend to take it all bit by bit so you’re very familiar with how the system works in the end. To understand each part of your site, you can check out other sections on the hub, and if you encounter any problems at all, feel free to contact us at [email protected], or check out Morla’s Guide.


