One of the most powerful features of CaboodleAI is the Newsletter. This helps you manage the content you send out, your audience count, and most importantly, how your content performs with detailed analytics and stats to track.
In this guide, we’ll be going over the newsletter in your day-to-day use of your Caboodle site.
Once you’ve logged into your account, go over to the left plane and click on the Newsletter tab. You’ll then see a short dropdown listing Email Sends, and Audience as you can see below:
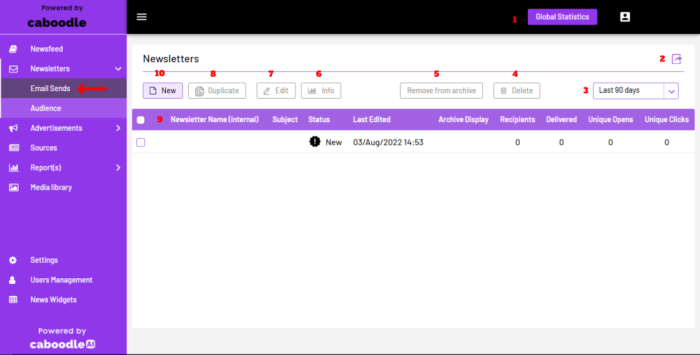
We’ll first be taking a look at the details on the Email Sends page. Let’s quickly go over 1-10 as seen above;
1- Global Statistics: To start off, we have the Global Statistics button, which shows the performance of your newsletter content with the audience, with several metrics being tracked and managed based on the specifics you’re looking for.
In the Global Stats tab, you’ll see a page that displays the percentage of your content that has been sent, delivered, opened, clicked, blocked, unsubscribed from and marked as spam. You can also filter each of these metrics by certain date ranges, and go further to specific newsletters to get info like click and view rate.
For a detailed guide on Global Statistics, you can have a look at this guide.
2- Export: This button will export/download all your campaign data to an excel/CSV file. In this file, you’ll be able to manage fields such as Createdate, Sentdate, Status, Period, and other metrics that you would normally find in the Global Statistics tab.
3- This date display shows the date range filter on your newsletters. You can filter from the last 7, 30 or 90 days.
4- Delete: This button helps you delete selected newsletters and they will not be recovered, so be careful with this one!
5- Remove from archives: The button takes off your newsletter campaign after you’ve sent it out to your audience. This feature is for content you’re not particularly interested in tracking.
6- Info: The info button helps you exactly what you think it does, and a bit more. It displays the send data on emails that you’ve sent out to your audience, showing brief stats of its performance and content metrics.
7- Edit: With the Edit button, you can change the settings and format used to create the selected newsletter.
8- Duplicate: This button helps clone your selected newsletter. It comes in handy in situations where you wish to maintain more settings than to change in your drafts.
9- The Newsletter table helps manage all your content drafts with the table fields. These include the Name of the newsletter, Subject, Status, Last Edited, Archive display, Recipients, Delivered, Unique Opens and Unique Clicks.
10- New: This is where the fun happens, creating a Newsletter! Once you click on this button, you’ll be directed to a new section to create your newsletter.
Here at CaboodleAI, we make sure to make our interface is as usable and relatable as possible. This is why creating your first Newsletter on your site isn’t too different from how you’re used to creating it on popular content publishers. So let’s take a look at it:
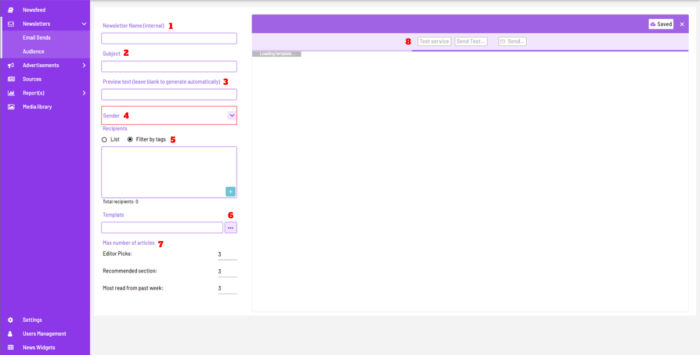
1- Newsletter Name: Well you definitely guessed right what this is for. You can give any naming to the newsletter being created as it stays internal and will not be visible to your audience.
2- Subject: Okay well this your audience will definitely see. The subject field indicates the subject of the mail that the newsletter will come into your audience’s mailbox.
3- Preview Text: This is another field that displays just below the Subject when your audience is viewing the mail. You have nothing to worry about if you don’t have one in mind, just leave it blank and Morla will generate one for you.
4- Sender: Over here is where you decide which sending profile will be handling the newsletter. You can have several sending profiles configured based on your sending domains and configuration. You can check out how that works here.
5- Recipients: Here you can choose to either send to certain lists( subscribers, trackers, etc), or use certain tags that identify your audience( portalsubscriber).
6- Template: You can have several template types to choose from based on how you want the newsletter to look. You can get in touch with us on your needs with this and we’ll create a template(s) of your choice and requirements, and also give you a rundown of making edits and managing your draft until you’re ready to send it out.
7- Number of articles: The newsletter is divided into 3sectiosn by default: Editor picks, Most read, and recommended. You can include a section of your choice based on the custom template you use, but with this, you can choose the number of articles that will be displayed in each section.
8- The Newsletter tab itself helps you view the draft being created, and make any edits of your choice. As you can see from the buttons, you can Test the mailing service to confirm that your newsletter will be delivered correctly. You can also Send a test email to have a look at it from your reader’s view, and you can Send the newsletter to the class of recipients filled when you’re all done with your edits and setup.
Way to go! You can now navigate the Newsletter feature to create, edit and send newsletters to your audience. And speaking of your audience, you can check out our guide on managing your audience here.
Have any issues with your newsletter? Feel free to get in touch if the issue falls in these categories or others;
- My test email is not being delivered to my inbox.
- An article isn’t being generated in my draft.
- My newsletters are being sent to spam.
- My sender profile is not showing up in the Sender field dropdown.


