So you’re now set with access to your Caboodle site as an administrator, but you would like your colleagues to also be able to access the site and all the features involved.
No worries, with this guide, you’ll be introduced to the User Management feature in Caboodle and how you can set up logins for other users and also manage rights and permissions as well.

As seen, there is a ‘User Management’ tab that manages all users on your Caboodle site. Click on it after logging into your site and you will see a similar screen as what is displayed above. There are a few features and setup options here, and we’ll be going over them so you get a general understanding of this.

1 – Search Bar: You can find a certain user with this feature by just searching using either their name or email address.
2 – Status Filters: This feature makes finding users much easier. With Status Filters, you can filter your users either by Active, Inactive, or All. Active users are users with current logins and have access to their Caboodle profile. The Inactive users are unable to access their accounts with their logins due to one reason or another, while All users mean exactly what it says.
3 – User List View: The user list view shows the detailed info of all users registered with the Caboodle site. The fields are First name, Last name, Email address, Created date, Created by, Job title, User type, and Status. Most of these fields are self-explanatory, and with the image above, you can understand better the info that matches each field.
4 – Add User: Here is the best feature on this page, adding a user. If you click on the button, you’ll be able to create a new user on your site. Clicking on it brings up the form below:
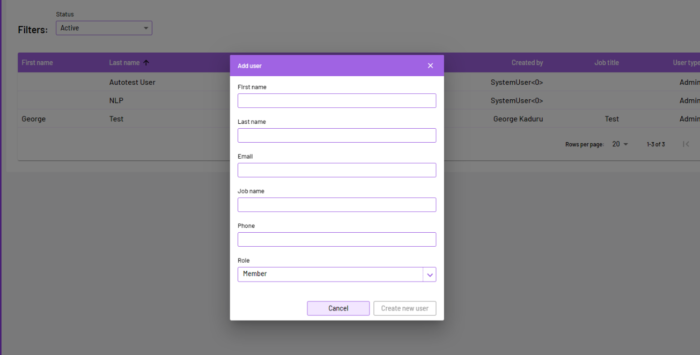
Creating a new user will basically involve filling in the fields as seen for the User List View. At the very bottom of the form, you get to choose if the user being added will be a Member or an Admin. Members are unable to send certain newsletters, view the User Management feature, and other permissions as well. Admins on the other hand have complete control of the site and can edit most things.
Once you fill out all the fields for the new user, the “Create new user” button will become active, and clicking on it will save your entry into the system. Afterward, the user will receive an email to set up Caboodle access. Clicking on the link to join Caboodle will then direct the user to the sign-up page to set up a password before logging in:

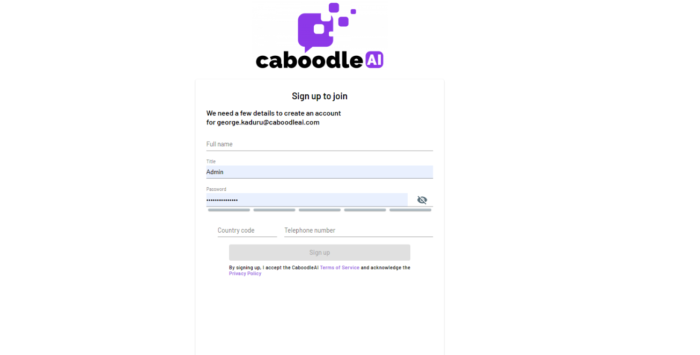
After signup, the user would be redirected to the CaboodleAI login page, and can now access the site through the company id and their password.
Resetting User Account.
There may be scenarios where one of the users that you’ve set up can’t access their account. This could be an issue from our end, or the user simply forgetting the password to the profile.
To handle this, go over to the User Management tab, and search for the user through the Search Bar and Status Filters. Once you do, double-click on their field, and this screen should show up:
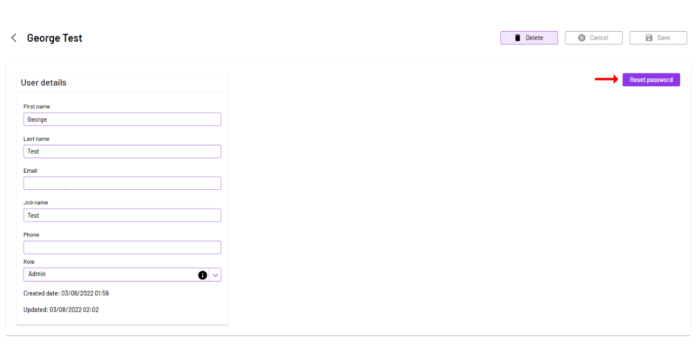
Now click on the “Reset Password” button, and a similar email to the one for setup will be sent to the user to reset the account and use a new password. You can also update users’ info in the fields above, just make sure to click on the “Save” button, but you probably guessed that already!
If you experience any issues with managing your company’s user profiles that go beyond resetting their account, feel free to reach out to us on it, and we’ll be happy to help.


